
How to Tighten 3D Printer Belt – A Detailed Step-by-Step Guide
One of the most common issues faced by 3D printer enthusiasts is the loosening of the belt over time, leading to dimensional inaccuracies and print quality degradation. A loose belt can cause layer shifting, misalignment, and even complete print failures, resulting in wasted time, material, and frustration.
Fortunately, tightening the belt on your 3D printer is a relatively straightforward process that can significantly improve your printing experience and ensure consistent, high-quality results.
In this article, we will dive deep into the world of 3D printer belts, exploring different methods for tightening them and providing step-by-step instructions to help you achieve the perfect belt tension.
Whether you’re a seasoned 3D printing expert or a newcomer to the hobby, this guide will equip you with the knowledge and techniques to keep your printer running smoothly.
How to Tighten 3D Printer Belt
Before we delve into the belt tightening process, it’s essential to understand the role and importance of belts in 3D printing. Most 3D printers rely on belts to drive the movement of the printhead (X and Y axes) and the build plate (Z-axis).
These belts are typically made of durable materials like reinforced rubber or polyurethane, ensuring smooth and precise motion during the printing process. Over time, however, belts can stretch or become loose due to wear and tear, leading to inaccuracies in print quality.
A loose belt can cause layer shifting, where layers don’t align correctly, resulting in visible seams or even complete print failures. Additionally, a loose belt can introduce vibrations and inconsistencies in motion, leading to surface imperfections and reduced overall print quality.
Method 1: Tensioning the Belt with Idler Pulleys
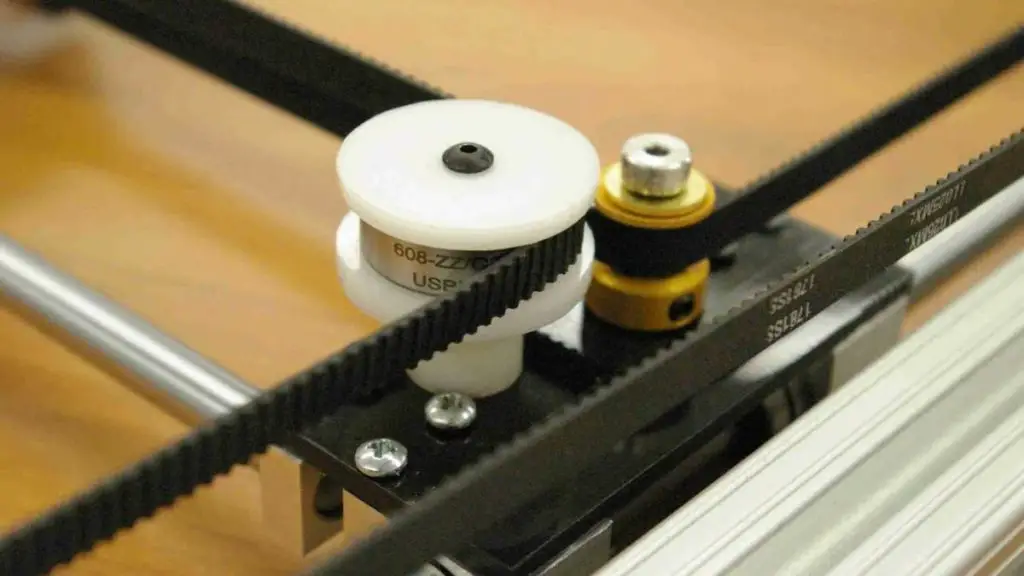
One of the most common methods for tightening a 3D printer belt involves adjusting the tension using idler pulleys. Idler pulleys are small, rotating wheels that apply tension to the belt by guiding it around a specific path. Most 3D printers come equipped with idler pulleys designed for this purpose.
Step 1: Locate the Idler Pulleys
The first step is to locate the idler pulleys on your 3D printer. Depending on the printer model, they may be located near the belt tensioners or along the belt path. Consult your printer’s manual or online resources for specific information on the location of the idler pulleys.
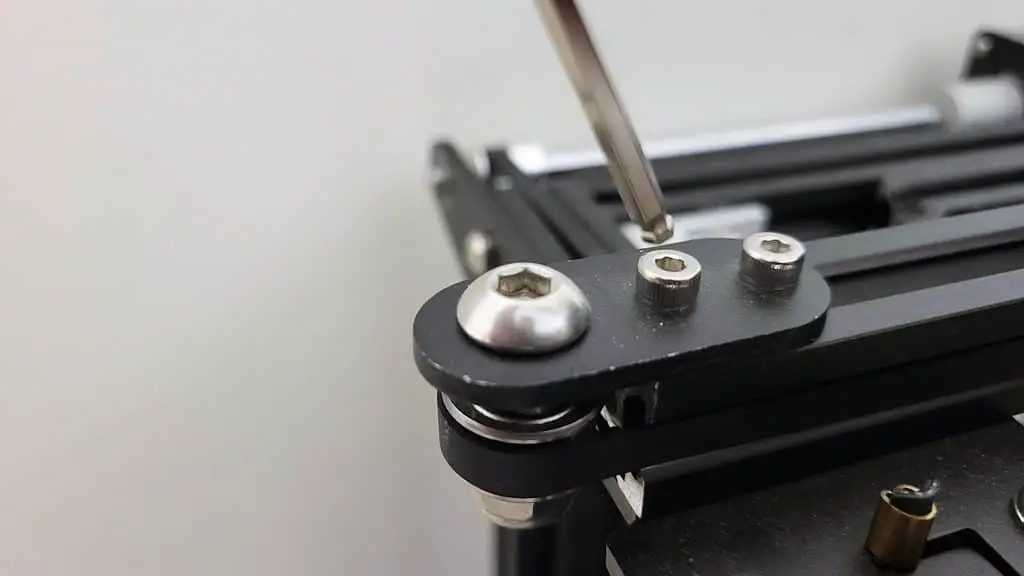
Step 2: Loosen the Idler Pulley Screws
Once you’ve identified the idler pulleys, use the appropriate tool (usually a hex key or Allen wrench) to loosen the screws or bolts that secure the idler pulleys in place. Be careful not to fully remove the screws, as you’ll need to re-tighten them once the belt tension is adjusted.
Step 3: Adjust the Belt Tension
With the idler pulleys loosened, you can now adjust the belt tension. Gently pull or push the idler pulleys along their designated path, increasing or decreasing the tension on the belt as needed.
The ideal belt tension should be tight enough to prevent sagging or slipping, but not too tight to cause excessive wear or strain on the belt or motor.
Step 4: Re-tighten the Idler Pulley Screws
Once you’ve achieved the desired belt tension, carefully re-tighten the idler pulley screws or bolts to secure the pulleys in their new positions. Be careful not to over-tighten the screws, as this can cause the idler pulleys to bind or create excessive friction.
Step 5: Test and Adjust as Needed
After tightening the idler pulleys, run a test print or perform a calibration routine to check the belt tension and print quality. If you notice any issues, such as layer shifting or inconsistent motion, you may need to repeat the process and adjust the belt tension further.
Related Guide: How to Change Print Speed on Ender 3
Method 2: Tensioning the Belt with Belt Tensioners
Some 3D printers come equipped with dedicated belt tensioners, which offer a more precise and convenient way to adjust belt tension. Belt tensioners are typically spring-loaded mechanisms that apply tension to the belt and can be adjusted using screws or knobs.
Step 1: Locate the Belt Tensioners
The first step is to locate the belt tensioners on your 3D printer. Refer to your printer’s manual or online resources for specific information on the location and operation of the belt tensioners.
Step 2: Loosen the Belt Tensioner Screws
Use the appropriate tool (usually a hex key or Allen wrench) to loosen the screws or bolts that secure the belt tensioners in place. Be careful not to fully remove the screws, as you’ll need to re-tighten them once the belt tension is adjusted.
Step 3: Adjust the Belt Tension
With the belt tensioners loosened, you can now adjust the belt tension by turning the tensioner screws or knobs. Turning the tensioners clockwise will increase the tension on the belt, while turning them counterclockwise will decrease the tension.
Step 4: Re-tighten the Belt Tensioner Screws
Once you’ve achieved the desired belt tension, carefully re-tighten the belt tensioner screws or bolts to secure the tensioners in their new positions. Be careful not to over-tighten the screws, as this can cause excessive strain on the belt or motor.
Step 5: Test and Adjust as Needed
After tightening the belt tensioners, run a test print or perform a calibration routine to check the belt tension and print quality. If you notice any issues, such as layer shifting or inconsistent motion, you may need to repeat the process and adjust the belt tension further.
Method 3: Manual Belt Tensioning (for Printers without Dedicated Tensioners)
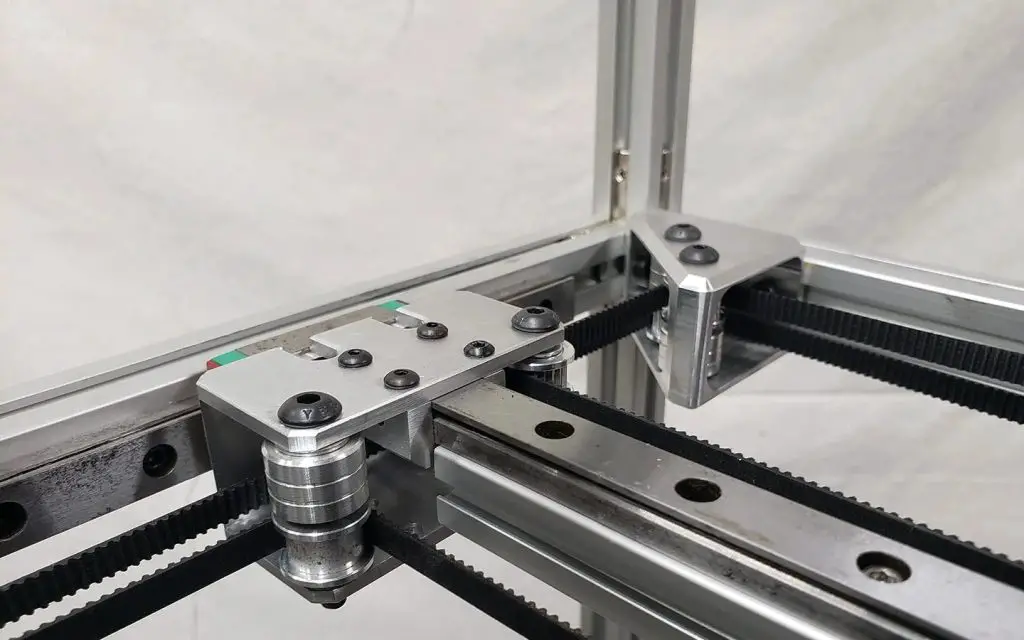
If your 3D printer does not have dedicated idler pulleys or belt tensioners, you may need to manually tension the belt. This method involves adjusting the position of the belt’s anchoring points or mounting hardware to increase or decrease the tension.
Step 1: Identify the Belt Anchoring Points
Locate the points where the belt is anchored or secured to the printer frame or components. These anchoring points may be screws, bolts, or other mounting hardware that hold the belt in place.
Step 2: Loosen the Anchoring Hardware
Use the appropriate tool (usually a screwdriver, hex key, or wrench) to loosen the anchoring hardware, allowing for adjustment of the belt’s position and tension.
Step 3: Adjust the Belt Tension
With the anchoring hardware loosened, you can now adjust the belt tension by carefully pulling or pushing the belt along its path. Aim for a tension that is tight enough to prevent sagging or slipping, but not too tight to cause excessive wear or strain on the belt or motor.
Step 4: Re-tighten the Anchoring Hardware
Once you’ve achieved the desired belt tension, carefully re-tighten the anchoring hardware to secure the belt in its new position. Be careful not to over-tighten the hardware, as this can cause excessive strain on the belt or motor.
Step 5: Test and Adjust as Needed
After tightening the anchoring hardware, run a test print or perform a calibration routine to check the belt tension and print quality. If you notice any issues, such as layer shifting or inconsistent motion, you may need to repeat the process and adjust the belt tension further.
Related Guide: How to Refill Epson Ink Cartridge 200
Additional Tips and Considerations

- Always consult your printer’s manual or online resources for specific instructions and recommendations for your particular model.
- When adjusting belt tension, aim for a balance between tight enough to prevent sagging or slipping, but not too tight to cause excessive wear or strain on the belt or motor.
- Periodically inspect your belts for signs of wear or damage, and replace them if necessary to maintain optimal print quality.
- Consider lubricating the belt pulleys or tensioners with a suitable lubricant to reduce friction and prolong the lifespan of your printer’s components.
- After tightening the belt, it’s a good practice to perform a thorough calibration routine to ensure accurate printing and compensate for any changes in belt tension or positioning.
Conclusion
Tightening the belt on your 3D printer is a crucial maintenance task that can significantly improve print quality, consistency, and overall performance. By following the methods outlined in this article, you will be able to effectively adjust the belt tension and keep your printer running smoothly.
Remember to consult your printer’s manual and exercise caution when working with the belt and tensioning mechanisms to avoid damaging your printer or risking injury.
With a properly tensioned belt, you can enjoy precise, high-quality prints and minimize the chances of layer shifting, misalignment, or other issues caused by a loose belt. Embrace the art of belt tensioning, and take your 3D printing experience to new heights of precision and reliability.
Frequently Asked Questions (FAQs)
1. How do you secure a 3D printer belt?
To secure a 3D printer belt, you need to ensure proper tension and alignment. First, locate the belt tensioning mechanism, which may involve tightening screws or adjusting a tensioner.
Apply enough tension to prevent slippage during operation, but not too much that it causes excessive friction. Next, check the belt’s alignment by moving the carriage or the belt itself along its path.
Adjust the belt’s position or the idler pulleys if necessary to ensure it runs straight and does not rub against any components. Proper belt tension and alignment are crucial for accurate and consistent 3D printing results.
2. How to tighten the belt on Ender 3?
To tighten the belt on an Ender 3 3D printer, start by locating the belt tensioner on the X or Y axis. These are typically small knobs or screws that allow you to adjust the belt tension. Loosen the tensioner slightly, then pull the belt taught, ensuring it has minimal slack but isn’t overly tight.
While holding the belt in position, tighten the tensioner to lock the belt in place. Repeat this process for both the X and Y axis belts. It’s essential to strike a balance, as overtightening can cause excessive friction and wear, while loose belts can lead to skipping and inaccurate prints.
3. How to tell if 3D printer belts are loose?
One way to tell if your 3D printer belts are loose is by observing the print quality. Loose belts can cause layer shifts, resulting in misaligned layers or a distinct diagonal pattern on the printed object.
Another telltale sign is audible vibrations or a clicking noise coming from the belt area during printing. You can also physically check the belt tension by gently pressing on the belt – it should have minimal give but not be overly tight.
Additionally, try moving the print head or build plate manually; if the belt slips or skips, it’s likely too loose. Regularly inspecting and adjusting the belt tension is crucial for maintaining print accuracy and quality.
How to Store 3D Printer Filament – Easy Steps to Follow
How to Make Thermal Printer Print Darker – 4 Easy Methods
How to Use Toybox 3D Printer – Easy Steps to Follow
About Author
Mark Kelly
This is Mark, a printer expert from North Carolina, US. It has been 8 years since I started using and reviewing printers of all types. With that said, I decided to share my knowledge with you lovely people so you can make the perfect choice when it comes to choosing a printer.