
How to Scan an Object for 3D Printing – Easy Ways to Follow
In the ever-evolving world of 3D printing, the ability to digitize physical objects has become a game-changer. Whether you’re an artist, designer, engineer, or hobbyist, the process of scanning an object and converting it into a 3D digital model opens up a world of possibilities.
From creating custom parts and figurines to preserving historical artifacts, 3D scanning has become an indispensable tool in the additive manufacturing realm. This article will guide you through the intricate process of scanning an object for 3D printing.
We will explore different scanning methods, the necessary equipment, and the steps involved in capturing an accurate digital representation of your desired object. So, let’s dive in and unlock the secrets of 3D scanning!
How to Scan an Object for 3D Printing
Before we delve into the scanning techniques, it’s essential to grasp the fundamental principles of 3D scanning. The process involves capturing data about the physical shape and dimensions of an object and converting it into a digital 3D model. This model can then be manipulated, modified, or directly sent to a 3D printer for fabrication.
3D scanners work by projecting a structured light pattern or laser onto the object’s surface and capturing the distorted reflections using one or more cameras. By analyzing these reflections, the scanner can calculate the object’s shape, texture, and color information, creating a highly accurate digital representation.
Method 1: Photogrammetry
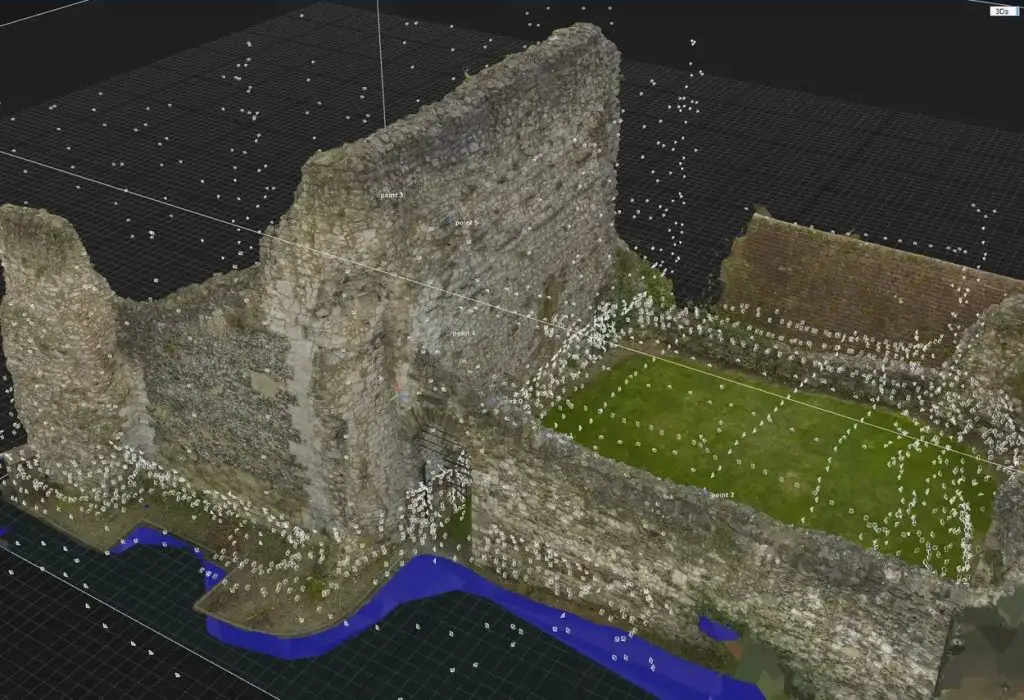
Photogrammetry is a technique that involves capturing multiple photographs of an object from various angles and using specialized software to stitch them together into a 3D model.
This method is particularly useful for scanning larger objects, as it doesn’t require expensive dedicated hardware.
Step 1: Prepare the Object and Environment
Begin by placing your object on a flat, non-reflective surface with a contrasting background. Ensure that the object is well-lit and free from shadows or glare. It’s also a good idea to use a turntable or slowly rotate the object while capturing images to ensure complete coverage.
Step 2: Capture Images
Using a high-quality digital camera, take numerous overlapping photographs of the object from different angles, making sure to cover every side and surface. It’s recommended to capture at least 50-100 images for a detailed model.
Step 3: Process the Images
Once you’ve captured the necessary images, transfer them to your computer and import them into photogrammetry software like Meshroom, Agisoft Photoscan, or Reality Capture. These programs will analyze the images, identify common points, and reconstruct the 3D geometry of the object.
Step 4: Clean and Export the Model
After the software has processed the images, you’ll have a 3D mesh representation of your object. At this stage, you can clean up the mesh by removing any unwanted artifacts or noise, and then export the model in a suitable format (e.g., STL, OBJ) for further processing or 3D printing.
Related Article: How to Use Fusion 360 for 3D Printing
Method 2: Laser Scanning

Laser scanning is a highly accurate and efficient method for capturing intricate details of an object. This technique uses a laser beam to sweep across the object’s surface, while specialized sensors measure the time-of-flight or phase shift of the reflected laser light to calculate the distance to each point on the surface.
Step 1: Set Up the Scanner
Begin by setting up your laser scanner according to the manufacturer’s instructions. This typically involves mounting the scanner on a stable surface or tripod and ensuring that it has a clear line of sight to the object you wish to scan.
Step 2: Calibrate the Scanner
Most laser scanners require calibration to ensure accurate measurements. Follow the instructions provided by the manufacturer to calibrate the scanner using a known reference object or calibration plate.
Step 3: Scan the Object
Once the scanner is calibrated, position your object within the scanning range and initiate the scanning process. Depending on the complexity of the object, you may need to capture multiple scans from different angles to ensure complete coverage.
Step 4: Align and Merge the Scans
After capturing the necessary scans, use the scanner’s software to align and merge the individual scans into a single, cohesive 3D model. This process may involve manually aligning the scans or using automated registration algorithms.
Step 5: Clean and Export the Model
Similar to photogrammetry, you’ll need to clean up the 3D mesh by removing any unwanted artifacts or noise. Once the model is optimized, export it in a suitable format for further processing or 3D printing.
Method 3: Structured Light Scanning
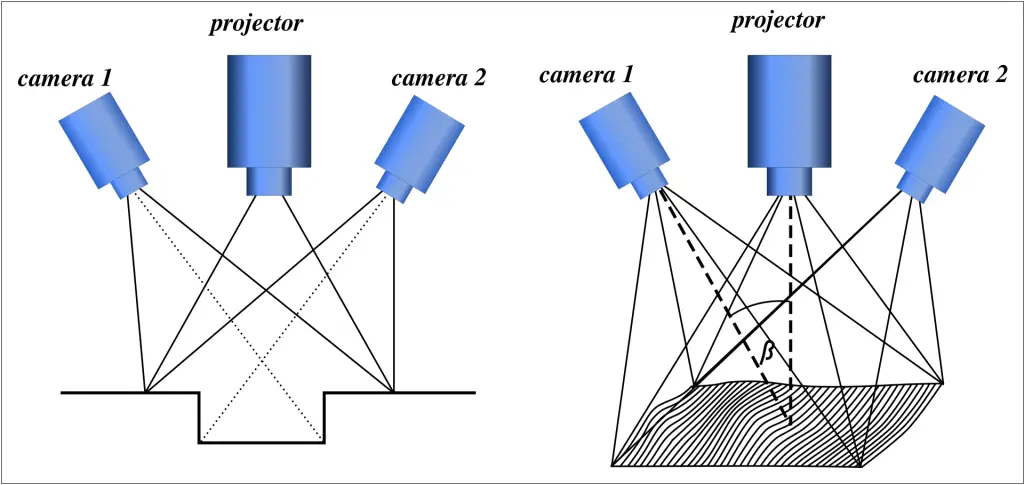
Structured light scanning is a hybrid approach that combines the principles of photogrammetry and laser scanning. It involves projecting a known pattern of light onto the object and capturing the distorted pattern with one or more cameras.
By analyzing the distortions in the pattern, the scanner can reconstruct the 3D shape of the object.
Step 1: Set Up the Scanner
Begin by setting up your structured light scanner according to the manufacturer’s instructions. This typically involves placing the scanner at a suitable distance from the object and ensuring that the projected light pattern is clearly visible on the object’s surface.
Step 2: Calibrate the Scanner
Like laser scanners, structured light scanners often require calibration to ensure accurate measurements. Follow the manufacturer’s instructions to calibrate the scanner using a known reference object or calibration plate.
Step 3: Scan the Object
Once the scanner is calibrated, position your object within the scanning range and initiate the scanning process. Depending on the complexity of the object, you may need to capture multiple scans from different angles to ensure complete coverage.
Step 4: Align and Merge the Scans
Similar to laser scanning, use the scanner’s software to align and merge the individual scans into a single, cohesive 3D model. This process may involve manually aligning the scans or using automated registration algorithms.
Step 5: Clean and Export the Model
Clean up the 3D mesh by removing any unwanted artifacts or noise, and then export the model in a suitable format for further processing or 3D printing.
Related Article: How to Store 3D Printer Filament
Post-Processing and Optimization

Regardless of the scanning method you choose, the resulting 3D model may require further post-processing and optimization before it’s ready for 3D printing. Here are some common steps to consider:
Mesh Cleaning and Repair
Scan data often contains holes, overlapping surfaces, or other imperfections that need to be addressed. Use mesh editing software like Meshlab, Blender, or Autodesk Meshmixer to clean up the model, fill in holes, and repair any defects.
Decimation and Simplification
Depending on the intended use of the 3D model, you may need to reduce the polygon count or simplify the mesh to improve performance or reduce file size. Most mesh editing software offers tools for decimation and simplification, allowing you to strike a balance between detail and efficiency.
Scaling and Orientation
Ensure that your 3D model is scaled correctly and oriented in the desired position for 3D printing. Most slicing software and 3D printing platforms have tools for scaling, rotating, and positioning models.
Slicing and Print Preparation
Once your 3D model is optimized, you’ll need to slice it into layers for your 3D printer. Use a slicer software like Cura, Slic3r, or Simplify3D to generate the necessary G-code instructions for your specific 3D printer and material.
Conclusion
Scanning an object for 3D printing is a fascinating process that combines cutting-edge technology with creativity and innovation. Whether you choose photogrammetry, laser scanning, or structured light scanning, the key to success lies in understanding the fundamentals, following proper procedures, and leveraging the right tools and software.
As the world of 3D printing continues to evolve, the ability to accurately capture and digitize physical objects will become increasingly valuable across various industries and applications. Embrace this technology, experiment with different scanning methods, and unlock a world of possibilities in additive manufacturing.
Frequently Asked Questions (FAQs)
1. Can you scan an item to 3D print?
Yes, it is possible to scan an item and create a 3D model for 3D printing. This process is known as 3D scanning or 3D capture. Various technologies like structured light scanning, laser scanning, and photogrammetry are used to capture the shape and dimensions of an object.
The captured data is then processed to create a digital 3D model that can be edited and optimized for 3D printing. However, it’s important to consider intellectual property rights and licensing before reproducing copyrighted or patented objects.
2. How do I scan a shape for 3D printing?
To scan a shape for 3D printing, you can utilize 3D scanning technologies. One common method is photogrammetry, where you capture multiple photographs of the object from different angles using a digital camera or smartphone. These images are then processed by specialized software to create a 3D model.
Alternatively, you can use structured light or laser scanners that project patterns onto the object and analyze the distortions to generate a 3D representation. Once you have the digital 3D model, you can refine and prepare it for 3D printing using slicing software.
3. Can I use my phone as a 3D scanner?
Yes, you can use your smartphone as a 3D scanner for capturing 3D models of objects. Many mobile apps leverage the phone’s camera and processing power to perform photogrammetry, a technique that combines multiple photos taken from different angles to recreate a 3D model.
Simply position the object on a rotating platform or move around it while capturing images from various viewpoints. The app then processes these images to generate a digital 3D representation suitable for 3D printing or other applications.
While not as accurate as dedicated 3D scanners, smartphone scanning offers a convenient and affordable solution for basic 3D scanning needs.
How to Download 3D Printer Files – 4 Easy Ways to Follow
How to Clean Glue Off 3D Printer Bed – Easy Ways to Follow
How to Store 3D Printer Filament – Easy Steps to Follow
About Author
Mark Kelly
This is Mark, a printer expert from North Carolina, US. It has been 8 years since I started using and reviewing printers of all types. With that said, I decided to share my knowledge with you lovely people so you can make the perfect choice when it comes to choosing a printer.