
How to Print Screen on Logitech Keyboard K780 – Easy Guide
In today’s digital landscape, the ability to capture screenshots has become an indispensable skill for both personal and professional endeavors. Whether you’re troubleshooting technical issues, crafting tutorials, or sharing intriguing content, mastering the art of taking screenshots quickly and efficiently is paramount.
For users of the Logitech K780 keyboard, this process might appear somewhat enigmatic compared to traditional keyboards.
This comprehensive guide aims to demystify the screenshot-taking process, providing you with various methods to capture your screen using the K780 keyboard effortlessly.
The Logitech K780, renowned for its versatility and innovative design, allows users to switch seamlessly between multiple devices. However, its unique layout can sometimes lead to confusion when performing standard tasks like taking screenshots.
By the end of this guide, you’ll be adept at capturing, saving, and editing screenshots efficiently, regardless of the operating system you’re using with your Logitech K780 keyboard. Let’s dive into the myriad techniques to perfect your screenshot skills.
How to Print Screen on Logitech Keyboard K780
We’ll explore default print screen functions, keyboard shortcuts, and software solutions to enhance your screenshot capabilities.
Method 1: Using the Default Print Screen Function
The most straightforward method to capture your screen using the Logitech K780 keyboard is by utilizing the default Print Screen function. This method works across various operating systems, including Windows, macOS, and Linux.
Step 1: Locate the Print Screen Key
On the Logitech K780, the Print Screen function is typically shared with the Insert key. Look for a key that has both “Insert” and a camera icon printed on it.
Step 2: Capture the Entire Screen
To capture your entire screen, press the Fn key and the Insert/Print Screen key simultaneously. This action will take a screenshot of your entire display and copy it to your clipboard.
Step 3: Capture the Active Window
If you only want to capture the currently active window, press the Alt key along with Fn + Insert/Print Screen. This combination will take a screenshot of only the window that’s currently in focus.
Step 4: Save Your Screenshot
After capturing your screenshot, open an image editing program like Paint (on Windows) or Preview (on macOS). Paste the screenshot from your clipboard by pressing Ctrl + V (Windows) or Command + V (macOS). You can then save the image in your desired format and location.
Related Guide: How to Power Clean Epson ET-2760
Method 2: Using Operating System Shortcuts
Different operating systems offer their own built-in shortcuts for taking screenshots. While these shortcuts may not directly involve the Logitech K780’s Print Screen key, they’re still valuable alternatives to know.
For Windows Users
Step 1: Use Windows + Print Screen
Press the Windows key and the Insert/Print Screen key simultaneously. This action will capture your entire screen and automatically save it as a PNG file in your Pictures > Screenshots folder.
Step 2: Use Windows + Shift + S
For more flexibility, press Windows + Shift + S. This combination opens the Snip & Sketch tool, allowing you to select a specific area, window, or the entire screen to capture.
For macOS Users
Step 1: Use Command + Shift + 3
Press Command + Shift + 3 simultaneously to capture your entire screen. The screenshot will be saved as a PNG file on your desktop.
Step 2: Use Command + Shift + 4
For a more precise selection, use Command + Shift + 4. This shortcut turns your cursor into a crosshair, allowing you to select a specific area to capture.
Method 3: Using Logitech Options Software
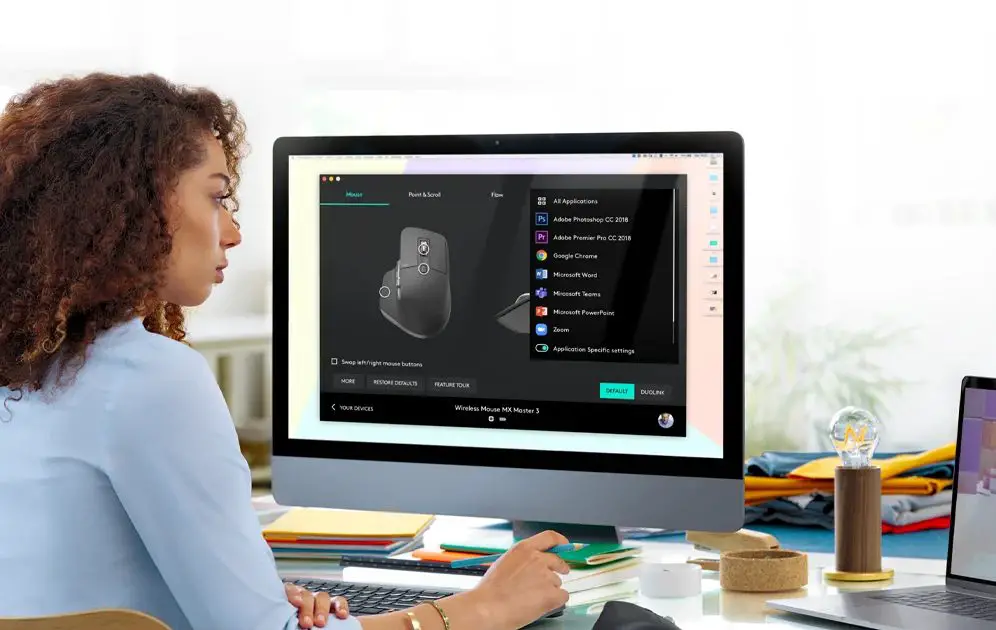
Logitech provides its own software called Logitech Options, which allows you to customize your K780 keyboard’s functions, including screenshot capabilities.
Step 1: Download and Install Logitech Options
Visit the official Logitech website and download the Logitech Options software. Install it on your computer following the on-screen instructions.
Step 2: Open Logitech Options
Launch the Logitech Options software. You should see your K780 keyboard listed among your devices.
Step 3: Customize the Print Screen Function
In the Logitech Options interface, locate the key you want to assign the Print Screen function to. Click on it and select “Screen Capture” or a similar option from the list of available functions.
Step 4: Set Up Custom Screenshot Actions
Logitech Options often allows you to set up custom actions for different types of screenshots. For example, you might assign a single press to capture the entire screen and a double press to capture the active window.
Step 5: Save Your Settings
After customizing your screenshot functions, make sure to save your settings in the Logitech Options software.
Related Article: How to Set Up Fax on HP Printer Without Phone Line
Method 4: Using Third-Party Screenshot Tools
While the built-in methods and Logitech Options provide ample screenshot capabilities, you might want to explore third-party tools for more advanced features.
Step 1: Choose a Screenshot Tool
Research and select a third-party screenshot tool that suits your needs. Popular options include Snagit, Greenshot, and ShareX for Windows, or Skitch and Monosnap for macOS.
Step 2: Install the Screenshot Tool
Download and install your chosen screenshot tool following the developer’s instructions.
Step 3: Configure Keyboard Shortcuts
Most third-party screenshot tools allow you to set custom keyboard shortcuts. Configure these to work with your Logitech K780 keyboard, possibly utilizing the function keys or other easily accessible key combinations.
Step 4: Explore Advanced Features
Take advantage of the advanced features offered by your chosen tool, such as annotations, automatic uploading, or video capture.
Conclusion
Mastering the art of taking screenshots with your Logitech K780 keyboard opens up a world of possibilities for communication, documentation, and content creation.
Whether you’re using the default Print Screen function, leveraging operating system shortcuts, customizing your experience with Logitech Options, or exploring third-party tools, you now have the knowledge to capture your screen effortlessly.
Remember that practice makes perfect. As you become more comfortable with these methods, you’ll find yourself seamlessly integrating screenshots into your daily workflow.
The versatility of the Logitech K780 keyboard, combined with these screenshot techniques, ensures that you’re always ready to capture and share important information, regardless of the device or platform you’re using.
Keep exploring new tools and techniques, and don’t hesitate to customize your setup to best suit your needs. With the right approach, taking screenshots can be not just a useful skill, but an enjoyable and creative process that enhances your digital experience.
Frequently Asked Questions (FAQs)
1. How do I use function keys on Logitech K780?
The Logitech K780 keyboard offers versatile functionality through its function keys. To access standard F1-F12 functions, simply press and hold the “fn” key (usually located near the bottom left) while pressing the desired F-key. For media controls and other special functions, use the icons on the number keys in combination with the “fn” key.
You can toggle between standard F-key and special functions by pressing “fn” + “esc”. For further customization, consider using the Logitech Options software. Some keys may have dual functions, indicated by different colored labels.
For specific details on your keyboard model, it’s best to consult the user manual, as exact layout and functionality can vary depending on your operating system and keyboard settings.
2. How to setup Logitech K780 keyboard
Setting up your Logitech K780 keyboard is straightforward. First, insert the batteries or ensure they’re charged. Then, turn on the keyboard using the power switch. To connect via Bluetooth, press one of the white channel buttons and pair it with your device’s Bluetooth settings. For the USB receiver option, plug the receiver into your computer’s USB port.
The K780 supports multi-device connectivity, allowing you to switch between up to three devices. Use the Easy-Switch buttons to toggle between them. Install Logitech Options software for advanced features and customization.
Remember to adjust your device’s keyboard settings if necessary, especially when switching between operating systems. With these steps, your K780 should be ready to enhance your typing experience across multiple devices.
3. What is the Windows key on Logitech K780 keyboard?
The Windows key on the Logitech K780 keyboard is located in the bottom left corner, near the Ctrl and Alt keys. It’s easily identifiable by the Windows logo printed on it. This key serves as a shortcut to open the Start menu in Windows operating systems.
On the K780, the Windows key may have dual functionality. When used with other keys, it can perform various system commands. For Mac users, this key often functions as the Command key. The exact behavior might vary depending on your operating system and keyboard settings.
Remember, you can customize the Windows key’s function using Logitech Options software, allowing you to tailor its behavior to your specific needs across different devices and operating systems.
How to Print Excel Sheets in A4 Size Full Page Landscape – 5 Easy Ways
How to Power Clean Epson 2720 – Easy Methods to Follow
How to Put 3D Print Files on SD Card – 3 Easy Methods to Follow
About Author
Mark Kelly
This is Mark, a printer expert from North Carolina, US. It has been 8 years since I started using and reviewing printers of all types. With that said, I decided to share my knowledge with you lovely people so you can make the perfect choice when it comes to choosing a printer.