
How to Install LH2612A Laser Toner Cartridge – Easy Steps to Follow
In the ever-evolving world of printing technology, laser printers have become an integral part of modern offices and households. These devices offer unparalleled speed, precision, and cost-effectiveness, making them a popular choice for various printing needs.
However, like any other machine, laser printers require periodic maintenance, including the replacement of toner cartridges. In this article, we will guide you through the process of installing the LH2612A laser toner cartridge, ensuring optimal printing performance and longevity for your printer.
The LH2612A toner cartridge is a high-yield cartridge designed for use in specific laser printer models, such as the HP LaserJet Pro M501dn, M501n, and M506dn. This cartridge is known for its exceptional print quality, producing crisp text and vivid images, making it an ideal choice for professional and personal use.
However, the installation process can seem daunting for those unfamiliar with printer maintenance. Fear not, as this guide will provide you with step-by-step instructions, ensuring a smooth and hassle-free installation experience.
Preparing for Installation

Before diving into the installation process, it is crucial to gather the necessary tools and materials. This will not only streamline the process but also ensure your safety and the proper handling of the toner cartridge.
Tools and Materials Needed
- LH2612A laser toner cartridge
- Soft, lint-free cloth
- Flat, clean surface (optional)
Method 1: Standard Installation
This method is suitable for most printer models and is the recommended approach for installing the LH2612A toner cartridge.
Step 1: Removing the Old Cartridge
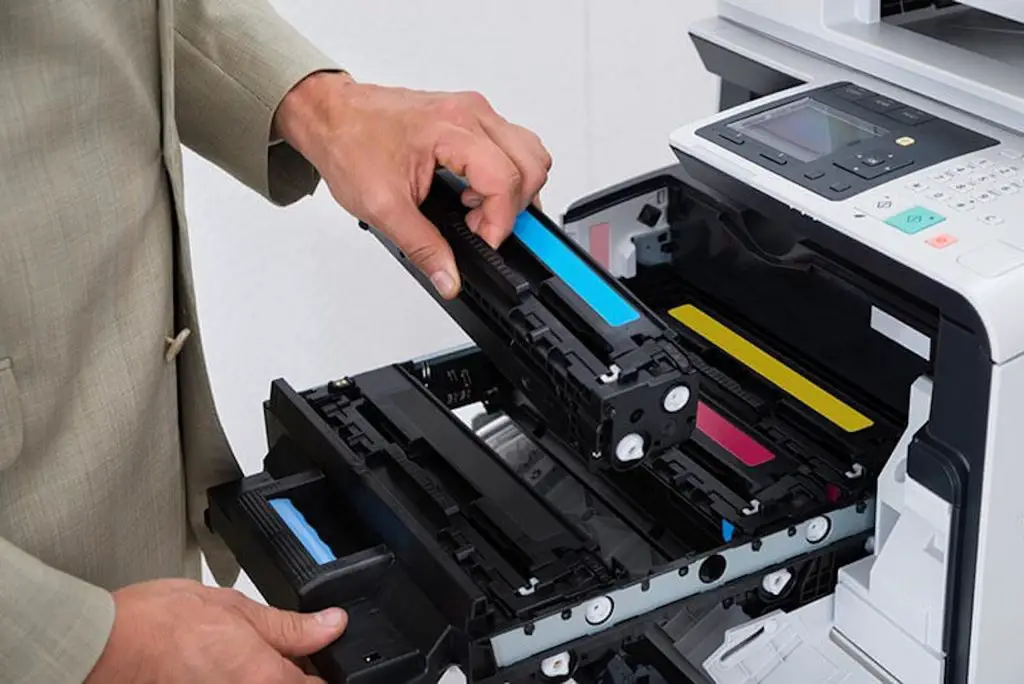
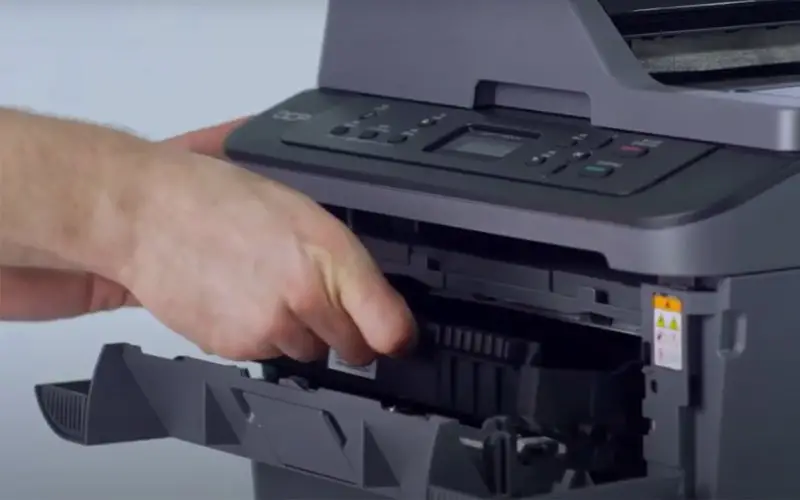
To begin, turn off your printer and unplug it from the power source. Next, open the printer’s top cover or front access door, depending on your printer model. Locate the toner cartridge and gently pull it out of the printer, being careful not to tilt or shake the cartridge, as this may cause toner leakage or unwanted mess.
Step 2: Preparing the New Cartridge
Remove the LH2612A toner cartridge from its packaging, taking care not to touch the imaging drum or expose it to direct light. Gently rock the cartridge back and forth several times to evenly distribute the toner inside. Using the soft, lint-free cloth, wipe any dust or debris from the cartridge’s surface and contacts.
Step 3: Installing the New Cartridge
Align the new LH2612A toner cartridge with the printer’s cartridge slot and gently insert it until it clicks into place. Close the printer’s top cover or front access door, ensuring it is securely latched.
Reconnect the printer to the power source and turn it on. Your printer may prompt you to confirm the installation of the new cartridge or perform a calibration cycle. Follow the on-screen instructions or consult your printer’s manual for specific guidance.
Related Article: How to Refill HP 67 Ink Cartridge
Method 2: Advanced Installation (For Specific Printer Models)
In some cases, certain printer models may require additional steps or precautions during the installation process. This method is designed for those specific situations.
Step 1: Preparing the Printer
Turn off your printer and unplug it from the power source. Open the printer’s top cover or front access door, and locate the transfer roller. Using the soft, lint-free cloth, gently clean the transfer roller to remove any toner residue or dust buildup.
Step 2: Removing the Old Cartridge
Follow the steps outlined in Method 1, Step 1, to remove the old toner cartridge from your printer. Once the cartridge is removed, place it on a flat, clean surface to prevent toner spills or contamination.
Step 3: Preparing the New Cartridge
Follow the steps outlined in Method 1, Step 2, to prepare the new LH2612A toner cartridge for installation. Additionally, locate the cartridge’s sealing tape or protective cover and remove it carefully, ensuring that no toner leaks or contaminates the printer.
Step 4: Installing the New Cartridge
Align the new LH2612A toner cartridge with the printer’s cartridge slot and gently insert it until it clicks into place. Close the printer’s top cover or front access door, ensuring it is securely latched. Reconnect the printer to the power source and turn it on.
Follow any on-screen prompts or instructions from your printer’s manual to complete the installation process, which may include calibration or cartridge recognition steps.
Troubleshooting and Tips

While the installation process for the LH2612A toner cartridge is straightforward, there may be instances where you encounter issues or have additional queries. Here are some troubleshooting tips and advice to help you navigate potential challenges:
Toner Leakage or Spills
If you notice any toner leakage or spills during the installation process, refrain from touching or inhaling the toner. Toner particles can be harmful if ingested or inhaled in large quantities. Instead, follow these steps:
- Carefully remove the toner cartridge from the printer and place it on a flat, clean surface.
- Use a soft, damp cloth to wipe away any spilled toner, taking care not to spread it further.
- Dispose of the used cloth and any toner residue properly, according to local regulations.
- Clean the printer’s interior with a vacuum cleaner designed for toner removal or a soft, dry cloth.
Related Article: How to Change Print Speed on Ender 3
Print Quality Issues
If you experience print quality issues, such as streaks, faded prints, or inconsistent toner coverage, after installing the new LH2612A toner cartridge, consider the following steps:
- Ensure that the toner cartridge is properly seated and secured in its slot.
- Check for any obstructions or debris within the printer’s paper path or toner cartridge area.
- Perform a calibration or cleaning cycle, as recommended by your printer’s manufacturer.
- If the issue persists, try replacing the transfer roller or other consumable parts, as they may be worn or damaged.
Cartridge Compatibility
While the LH2612A toner cartridge is designed for specific printer models, it is essential to double-check compatibility before attempting installation.
Consult your printer’s manual or the manufacturer’s website to ensure that the cartridge is compatible with your printer model. Using an incompatible cartridge can lead to printer damage or void your warranty.
Maintenance and Handling
Proper maintenance and handling of the LH2612A toner cartridge can significantly extend its lifespan and ensure optimal print quality. Here are some tips to keep in mind:
- Store new toner cartridges in a cool, dry place, away from direct sunlight or extreme temperatures.
- Avoid touching the imaging drum or exposing it to direct light, as this can cause damage and affect print quality.
- Regularly clean your printer’s interior and exterior to prevent dust and debris buildup, which can interfere with the printing process.
- Follow the recommended page yield or replacement guidelines provided by the manufacturer to ensure consistent print quality and prevent damage to your printer.
Conclusion
Installing the LH2612A laser toner cartridge is a straightforward process that can be accomplished with ease by following the provided steps and guidelines. Whether you choose the standard installation method or the advanced approach for specific printer models, adhering to the instructions will ensure a seamless and successful installation experience.
Remember, proper maintenance and handling of your toner cartridges and printer are crucial for prolonging their lifespan and achieving consistent, high-quality print results. By incorporating the troubleshooting tips and best practices outlined in this article, you can confidently navigate any potential challenges and enjoy a hassle-free printing experience with your laser printer.
Frequently Asked Questions (FAQs)

1. How to install HP LaserJet 12A cartridge?
To install an HP LaserJet 12A cartridge, follow these steps: Open the printer’s cartridge door and remove the old cartridge. Carefully remove the new 12A cartridge from its packaging, being careful not to touch the drum surface.
Gently rock the cartridge back and forth to distribute the toner evenly. Insert the new cartridge into the printer’s cartridge slot and push it firmly until it clicks into place. Close the cartridge door and run a test print to ensure proper installation.
2. What printer uses HP 12A cartridge?
The HP 12A toner cartridge is designed for use in several HP LaserJet printers, including the LaserJet 1010, 1012, 1015, 1018, 1020, 3015, 3020, 3030, and 3050 series. These are monochrome laser printers widely used in small offices, home offices, and workgroups.
The 12A cartridge is a standard-yield cartridge that can print approximately 2,000 pages, ensuring reliable and cost-effective printing for these popular HP LaserJet models.
3. How do you install a Pantum toner cartridge?
To install a Pantum toner cartridge, follow these steps: First, open the printer’s front cover and locate the toner cartridge compartment. Next, remove the old toner cartridge by gently pulling it out. Unpack the new Pantum toner cartridge, being careful not to touch the imaging drum.
Gently rock the cartridge back and forth to distribute the toner evenly inside. Align the new cartridge with the compartment guides and slide it in until it clicks into place. Finally, close the printer’s front cover, and you’re ready to print with the new Pantum toner cartridge installed.
How to Change Toner Cartridge in Brother Printer MFC-L2750DW

How to Refill Epson Ink Cartridge 200 – Easy Steps to Follow
How to Replace Ink Cartridge in HP Laserjet Pro MFP M428fdw – Easy Steps
About Author
Mark Kelly
This is Mark, a printer expert from North Carolina, US. It has been 8 years since I started using and reviewing printers of all types. With that said, I decided to share my knowledge with you lovely people so you can make the perfect choice when it comes to choosing a printer.