
How to Download 3D Printer Files – 4 Easy Ways to Follow
Welcome to the exciting world of 3D printing! If you’re ready to bring digital designs to life, you’ve come to the right place. This guide will walk you through the ins and outs of downloading 3D printer files – the digital blueprints that tell your printer what to create.
Think of these files as recipes for your 3D printer. Just as a chef needs a recipe to whip up a delicious meal, your printer needs these files to cook up amazing objects. Whether you’re a curious beginner or a seasoned maker, knowing how to find and download these files is key to your 3D printing success.
By the end of this article, you’ll be navigating the vast ecosystem of 3D printable content like a pro, ready to transform bits and bytes into tangible, three-dimensional objects. Let’s dive in and unravel the intricacies of this fascinating digital-to-physical pipeline!
How to Download 3D Printer Files
We’ll explore various ways to get your hands on 3D printer files, from free treasure troves to professional marketplaces.
Method 1: Downloading from Free Repositories
Free repositories are an excellent starting point for beginners and hobbyists looking to explore 3D printing without financial investment. Here’s how to download files from these platforms.
Step 1: Choose a reputable free repository
Popular options include Thingiverse, MyMiniFactory, and Prusaprinters.
Step 2: Create an account (if required)
Some platforms allow downloads without an account, but registering often provides additional features.
Step 3: Search for desired models
Use the search function or browse categories to find 3D printable files that interest you.
Step 4: Select a model
Click on the model you want to download to view its details page.
Step 5: Locate the download button
Look for a prominent “Download” or “Download All Files” button, usually near the top of the page.
Step 6: Choose file format (if applicable)
Some models offer multiple file formats. Select the one compatible with your 3D printer or software.
Step 7: Initiate download
Click the download button and select a save location on your computer.
Step 8: Extract files (if necessary)
Note: If the downloaded file is compressed (e.g., ZIP format) then extract its contents using your preferred software.
Method 2: Purchasing from Paid Marketplaces

For more sophisticated or professionally designed models, paid marketplaces offer a wide selection of high-quality 3D printable files. Here’s how to purchase and download from these platforms.
Step 1: Select a reputable marketplace
Popular paid platforms include CGTrader, Turbosquid, and Cults3D.
Step 2: Create an account
You’ll need to register and set up payment information to make purchases.
Step 3: Search for desired models
Use filters to narrow down results by price, category, or file format.
Step 4: Review model details
Carefully read the product description, specifications, and user reviews.
Step 5: Add to cart and checkout
Once you’ve decided on a model, add it to your cart and proceed to checkout.
Step 6: Complete the purchase
Enter your payment information and confirm the transaction.
Step 7: Access your purchases
Navigate to your account’s “Purchases” or “Downloads” section.
Step 8: Download the files
Click the download button for your purchased model and save it to your computer.
Step 9: Verify the download
Ensure all necessary files are included and undamaged.
Related Article: How to Clean Glue Off 3D Printer Bed
Method 3: Utilizing 3D Scanning Applications
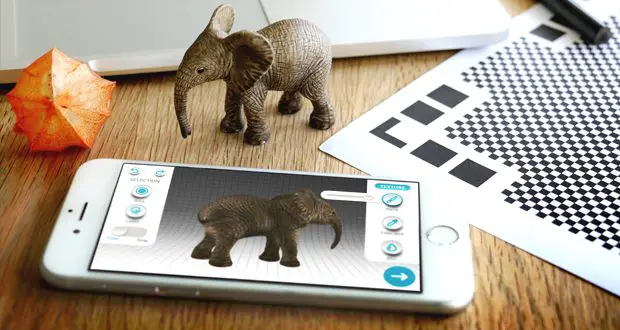
For those interested in creating and downloading their own 3D models, 3D scanning apps offer an innovative solution. Here’s how to use these applications.
Step 1: Choose a 3D scanning app
Select an app compatible with your device, such as Qlone for smartphones or Skanect for dedicated 3D scanners.
Step 2: Install the application
Download and install the chosen app from your device’s app store.
Step 3: Prepare the object for scanning
Ensure proper lighting and a clutter-free background for best results.
Step 4: Follow the app’s scanning instructions
This typically involves moving your device around the object to capture it from all angles.
Step 5: Process the scan
Allow the app to process the captured data and generate a 3D model.
Step 6: Edit and refine (if necessary)
Use the app’s built-in tools to clean up and optimize the model.
Step 7: Export the file
Choose your preferred file format (usually STL) and export the model.
Step 8: Transfer to your computer
Use cloud storage, email, or direct file transfer to move the 3D model to your computer.
Certainly. Here’s the continuation with Method 4:
Method 4: Using CAD Software for Custom Designs

For those with design skills, creating custom 3D models using Computer-Aided Design (CAD) software is an option. Here’s a general process.
Step 1: Choose CAD software
Select a program suitable for your skill level, such as Tinkercad for beginners or Fusion 360 for more advanced users.
Step 2: Design your model
Use the software’s tools to create your 3D model from scratch or modify existing designs.
Step 3: Validate the model
Ensure your design is 3D printable by checking for issues like non-manifold edges or inverted normals.
Step 4: Export the file
Save your design in a 3D printable format, typically STL.
Step 5: Store locally
Save the exported file to a dedicated folder on your computer for easy access.
Tip: Check user ratings and reviews. Look for models with positive feedback and high download counts.
Conclusion
Mastering the art of downloading 3D printer files opens up a world of creative possibilities. Whether you’re sourcing models from free repositories, purchasing premium designs, or creating your own through 3D scanning or CAD software, the process is fundamental to successful 3D printing.
Remember to approach downloads with a discerning eye, prioritizing quality and adhering to licensing requirements. As you build your library of 3D printable files, maintain good organizational habits to ensure you can easily find and utilize your digital assets.
The landscape of 3D printable content is vast and ever-expanding. With the knowledge gained from this guide, you’re now equipped to navigate this terrain confidently. From simple decorative objects to complex functional parts, the perfect 3D model for your next project is just a download away.
As you continue your 3D printing journey, stay curious and don’t hesitate to experiment with different sources and types of 3D models. Each download is an opportunity to learn, create, and push the boundaries of what’s possible with your 3D printer.
Frequently Asked Questions (FAQs)
1. How do I Export a 3D print file?
To export a 3D print file, first ensure your 3D model is ready for printing. Most 3D modeling software allows you to save or export your design in the widely-used STL format.
Select “Export” or “Save As” from the file menu, then choose STL as the output format. Some programs may offer additional options like resolution or unit settings during export.
Once exported, you can open the STL file in slicing software to generate the final G-code file for your 3D printer. Remember to check your model for any errors or issues before exporting to ensure a successful print.
For an in-depth and complete solution, you can check out our guide on how to make 3D printer files.
2. What is the best website for 3D printing?
The “best” website for 3D printing depends on your specific needs and experience level. For beginners, Thingiverse offers a vast library of free, ready-to-print models. Printables (formerly PrusaPrinters) is growing in popularity, featuring high-quality designs and an active community.
For those looking to sell or purchase 3D models, MyMiniFactory and Cults3D are excellent options. If you’re into creating your own designs, TinkerCAD provides a user-friendly, browser-based 3D modeling tool.
For more advanced users, GrabCAD offers a platform to share complex designs and collaborate with other professionals. Ultimately, exploring multiple platforms will help you find the one that best suits your 3D printing journey.
3. How to make a 3D printer file?
To create a 3D printer file, start by designing your object using 3D modeling software like Fusion 360, Blender, or TinkerCAD. Once your design is complete, export it as an STL file, which is the standard format for 3D printing.
Next, use slicing software such as Cura or PrusaSlicer to convert the STL into a G-code file, which contains the specific instructions for your 3D printer. In the slicer, you can adjust settings like layer height, infill density, and support structures.
After slicing, save the G-code file to an SD card or send it directly to your printer via USB or Wi-Fi, depending on your printer’s capabilities.
How to Make 3D Printer Files – Easy Ways
How to Use Fusion 360 for 3D Printing – Easy Ways to Follow

How to Use Blender for 3D Printing – Easy Ways to Follow
About Author
Mark Kelly
This is Mark, a printer expert from North Carolina, US. It has been 8 years since I started using and reviewing printers of all types. With that said, I decided to share my knowledge with you lovely people so you can make the perfect choice when it comes to choosing a printer.