
How to Clean Glue Off 3D Printer Bed – Easy Ways to Follow
3D printing has revolutionized the manufacturing landscape, empowering creators to transform their ideas into tangible realities with unprecedented ease. However, this technological marvel comes with its own set of challenges, chief among them being the maintenance of the printer bed.
A crucial aspect of this upkeep is the removal of adhesive residues, commonly used to enhance print adhesion.
The accumulation of glue on the printer bed, while initially beneficial for securing prints, can become a vexing issue over time. This buildup not only affects the bed’s surface quality but can also compromise the integrity of subsequent prints.
As such, mastering the art of cleaning glue off a 3D printer bed is an indispensable skill for any enthusiast or professional in this field.
This comprehensive guide delves into the intricacies of various cleaning methods, tailored to different bed materials and adhesive types. From water-based solutions to more robust chemical approaches, we’ll explore techniques suitable for novices and seasoned practitioners alike.
By understanding and implementing these methods, you’ll ensure the longevity of your printer bed and the consistent quality of your creations.
How to Clean Glue Off 3D Printer Bed
As we delve into the various cleaning methods, we’ll discuss the tools and materials you’ll need, safety precautions to keep in mind, and step-by-step instructions for each technique.
Method 1: Water-Based Cleaning for Water-Soluble Glues
One of the simplest and most common methods for cleaning glue off a 3D printer bed is using water, especially when dealing with water-soluble adhesives like common glue sticks. This method is particularly effective for glass beds but can also be used on other surfaces with caution.
Step 1: Prepare the Printer
Ensure your 3D printer is turned off and unplugged. Allow the printer bed to cool completely if it has been recently used. Remove any loose debris or filament remnants from the bed surface.
Step 2: Apply Warm Water
Fill a spray bottle with warm water. Alternatively, you can use a clean, lint-free cloth soaked in warm water. Spray or apply the warm water generously over the areas with glue residue. Be careful not to let water drip into any electronic components of your printer.
Step 3: Let It Soak
Allow the water to sit on the bed surface for about 5-10 minutes. This soaking time helps to soften and dissolve the water-soluble glue, making it easier to remove.
Step 4: Scrape Gently
Using a plastic scraper or an old credit card, gently scrape the softened glue residue. Work in small sections, applying light pressure to avoid scratching the bed surface. For stubborn areas, you may need to reapply water and let it soak again.
Step 5: Wipe Clean
Once you’ve loosened most of the glue, use a microfiber cloth or paper towel to wipe the bed clean. You may need to rinse the cloth and repeat this step several times to remove all traces of glue.
Step 6: Dry Thoroughly
Use a clean, dry microfiber cloth to thoroughly dry the printer bed. Ensure no moisture remains, as this could affect future print adhesion or potentially damage your printer if left unchecked.
Step 7: Inspect and Repeat if Necessary
Carefully inspect the bed surface under good lighting. If you notice any remaining glue residue, repeat the process focusing on those specific areas.
This water-based cleaning method is generally safe for most printer bed surfaces and is particularly effective for water-soluble glues. However, always consult your printer’s manual to ensure this method is suitable for your specific bed material.
Method 2: Isopropyl Alcohol Cleaning
For more stubborn glue residues or when dealing with non-water-soluble adhesives, isopropyl alcohol (IPA) can be an effective cleaning agent. This method is suitable for many printer bed materials, including glass, PEI, and some coated surfaces.
Step 1: Safety First
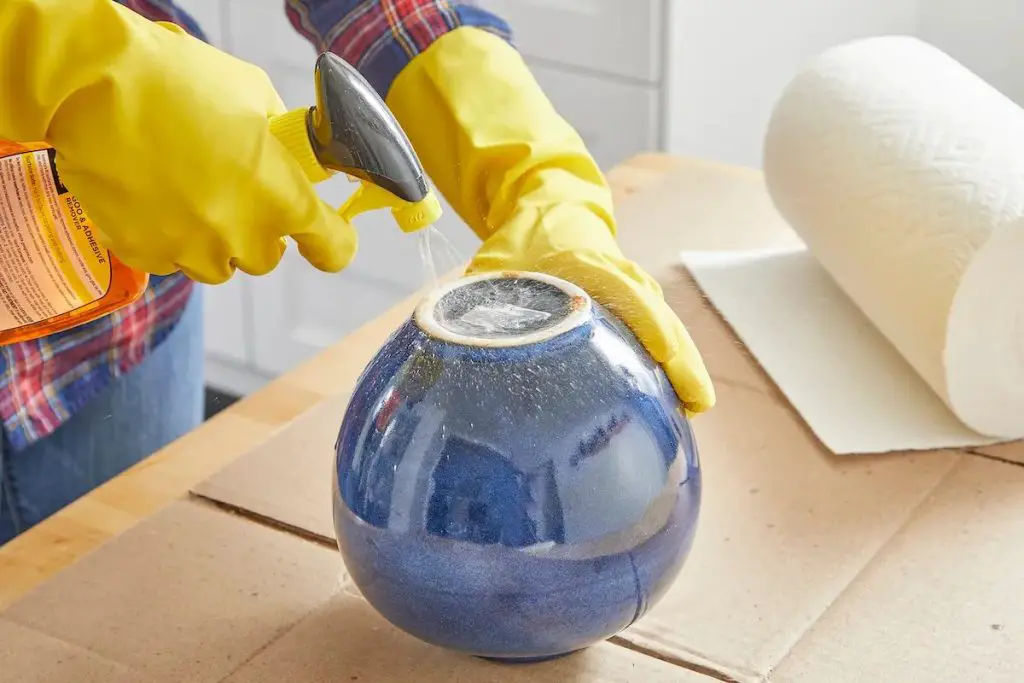
Ensure your work area is well-ventilated, as isopropyl alcohol fumes can be harmful if inhaled in large quantities. Wear gloves to protect your skin from prolonged exposure to the alcohol.
Step 2: Prepare the Cleaning Solution
Pour some 90% or higher isopropyl alcohol into a spray bottle. If you don’t have a spray bottle, you can apply the alcohol using a lint-free cloth.
Step 3: Apply the Alcohol
Spray or apply the isopropyl alcohol generously over the glue-covered areas of the printer bed. Be cautious not to oversaturate the bed or allow the alcohol to drip onto other parts of the printer.
Step 4: Let It Work
Allow the alcohol to sit on the surface for about 1-2 minutes. This time allows the alcohol to penetrate and break down the glue residue.
Step 5: Scrub Gently
Using a soft, lint-free cloth or a non-abrasive sponge, gently scrub the bed surface in circular motions. The glue should start to come off easily. For tougher spots, you may need to apply more alcohol and scrub a bit harder.
Step 6: Wipe Clean
Use a clean section of the cloth or a fresh paper towel to wipe away the dissolved glue and excess alcohol. You may need to repeat this step several times with clean sections of the cloth to ensure all residue is removed.
Step 7: Final Rinse
To remove any remaining traces of alcohol and glue, give the bed a final wipe-down with a cloth dampened with clean water. This step helps to ensure no alcohol residue is left behind, which could potentially affect future print adhesion.
Step 8: Dry Thoroughly
Use a clean, dry microfiber cloth to completely dry the printer bed. Ensure no moisture remains on the surface.
Step 9: Inspect and Repeat if Necessary
Carefully examine the bed surface under good lighting. If you notice any remaining glue residue, repeat the process, focusing on those specific areas.
The isopropyl alcohol method is highly effective for removing various types of glue and adhesives.
Keep in Mind: It is important to note that frequent use of alcohol can potentially degrade certain bed materials over time. Always check your printer’s manual or consult the manufacturer to ensure this method is safe for your specific bed type.
Related Article: How to Print Cardstock on HP Printer
Method 3: Heat-Assisted Cleaning
For particularly stubborn glue residues or when dealing with high-temperature adhesives, applying heat can significantly facilitate the cleaning process. This method can be effective on glass beds and some other heat-resistant surfaces.
Step 1: Prepare the Printer
Ensure your 3D printer is plugged in but not actively printing. Remove any loose debris or filament remnants from the bed surface.
Step 2: Heat the Bed
Using your printer’s control panel or connected software, set the bed temperature to around 50-60°C (122-140°F). This temperature is usually sufficient to soften most glues without risking damage to the printer or bed surface. Allow the bed to heat up fully.
Step 3: Apply Cleaning Solution
While the bed is warm, spray or apply a mixture of warm water and dish soap onto the glue-covered areas. Be cautious when working with the heated bed to avoid burns. For non-water-soluble adhesives, you can use isopropyl alcohol instead.
Step 4: Let It Soak
Allow the cleaning solution to sit on the warm bed for about 2-3 minutes. The combination of heat and moisture will help to soften and break down the glue residue.
Step 5: Scrape Carefully
Using a plastic scraper or an old credit card, gently scrape the softened glue residue. The heat should make this process easier than scraping at room temperature. Work in small sections, applying light pressure to avoid scratching the bed surface.
Step 6: Wipe Clean
Use a microfiber cloth or paper towel to wipe away the loosened glue and cleaning solution. You may need to repeat this step several times with clean sections of the cloth.
Step 7: Rinse and Dry
Once most of the glue is removed, give the bed a final wipe-down with a cloth dampened with clean water to remove any remaining soap or residue. Then, use a clean, dry microfiber cloth to thoroughly dry the printer bed.
Step 8: Cool Down and Inspect
Turn off the bed heating and allow it to cool to room temperature. Once cooled, inspect the surface under good lighting. If you notice any remaining glue residue, you may need to repeat the process or try one of the other cleaning methods.
The heat-assisted cleaning method can be particularly effective for stubborn adhesives, but it’s important to exercise caution when working with a heated bed.
Always follow your printer’s guidelines for maximum bed temperatures and never exceed the recommended heat levels for your specific bed material.
Method 4: Commercial Adhesive Removers
For the most persistent glue residues or when dealing with specialized adhesives, commercial adhesive removers can be a powerful solution. These products are designed specifically to break down and remove various types of glues and adhesives.
Step 1: Choose the Right Product
Select a commercial adhesive remover that is safe for use on your specific printer bed material. Look for products that are non-abrasive and won’t damage plastic or coated surfaces. Goo Gone, Un-Du, or similar products are often suitable choices.
Step 2: Ventilate and Protect
Ensure your work area is well-ventilated, as many adhesive removers have strong fumes. Wear gloves to protect your skin, and consider using eye protection as well.
Step 3: Test in an Inconspicuous Area
Before applying the adhesive remover to the entire bed, test it on a small, inconspicuous area to ensure it doesn’t damage or discolor the surface.
Step 4: Apply the Adhesive Remover
Following the product instructions, apply the adhesive remover to the glue-covered areas of the printer bed. Some products may require you to let them sit for a specific amount of time to work effectively.
Step 5: Agitate and Scrape
Using a soft cloth or a plastic scraper, gently agitate the adhesive remover on the surface. For stubborn spots, you may need to let the product sit longer or reapply.
Step 6: Wipe Clean
Use a clean cloth or paper towel to wipe away the dissolved glue and excess adhesive remover. You may need to repeat this step several times to ensure all residue is removed.
Step 7: Neutralize and Rinse
Many adhesive removers require a neutralization step. This often involves wiping the surface with isopropyl alcohol or a specific neutralizing solution. Follow the product instructions carefully for this step.
Step 8: Final Cleaning
Give the bed a thorough cleaning with warm, soapy water to remove any remaining traces of the adhesive remover. Rinse well with clean water.
Step 9: Dry and Inspect
Use a clean, dry microfiber cloth to thoroughly dry the printer bed. Once dry, inspect the surface under good lighting to ensure all glue and cleaning product residues have been removed.
While commercial adhesive removers can be highly effective, they should be used with caution. Always follow the product instructions carefully and ensure compatibility with your printer bed material.
Note: Some removers may be too harsh for certain surfaces, so it’s crucial to choose an appropriate product and test it before full application.
Related Article: How to Make 3D Printer Files
Conclusion
Maintaining a clean 3D printer bed is crucial for achieving high-quality prints and extending the life of your printer. While removing glue residue can sometimes be challenging, the methods outlined in this guide provide effective solutions for various types of adhesives and bed materials.
Whether you opt for the simplicity of water-based cleaning, the effectiveness of isopropyl alcohol, the power of heat-assisted removal, or the strength of commercial adhesive removers, the key is to approach the task with patience and care. Always prioritize the safety of your printer and yourself by following manufacturer guidelines and taking necessary precautions.
Remember that prevention is often easier than cure. By adopting good practices in adhesive application and regular maintenance, you can minimize the frequency and intensity of your cleaning sessions.
As 3D printing technology continues to evolve, so too will the methods and products available for maintaining your equipment. Stay informed about new developments in bed adhesion techniques and cleaning solutions to ensure you’re always using the most effective and efficient methods for your specific printer and printing needs.
With a clean, well-maintained printer bed, you’re setting the foundation for successful prints and unleashing the full potential of your 3D printing projects. Happy printing!
Frequently Asked Questions (FAQs)
1. How do you remove adhesive from a 3D printer bed?
Removing adhesive from a 3D printer bed requires careful attention to avoid damaging the surface. Start by heating the bed to soften the adhesive, then gently scrape it off using a plastic spatula or old credit card.
For stubborn residue, apply isopropyl alcohol or a specialized 3D printer bed cleaner and let it sit for a few minutes before wiping with a microfiber cloth. Avoid using harsh chemicals or abrasive materials that could scratch the bed.
For particularly difficult adhesive, you can try using a citrus-based adhesive remover. Always test cleaning methods on a small area first, and be sure to re-level your print bed after thorough cleaning.
2. How do you clean a 3D printer bed?
Cleaning a 3D printer bed is essential for maintaining print quality. Begin by allowing the bed to cool completely. Use a soft brush or lint-free cloth to remove loose debris. For tougher residue, dampen a microfiber cloth with isopropyl alcohol and gently wipe the surface.
Avoid abrasive materials or harsh chemicals that could damage the bed. For glass beds, a razor blade can carefully scrape off stubborn deposits. Some users find success with specialized 3D printer bed cleaners or a mixture of warm water and mild dish soap.
After cleaning, ensure the bed is completely dry before use. Regular maintenance between prints helps prevent build-up and extends the life of your printer bed.
3. How to clean glue from 3D printed parts?
Removing glue from 3D printed parts requires gentle handling to preserve the model’s integrity. Start by soaking the part in warm water for 15-20 minutes to soften the glue. For water-soluble glues, this may be enough to rinse away the residue.
For tougher adhesives, create a solution of warm water and mild dish soap. Gently scrub the part with a soft-bristled toothbrush, paying extra attention to crevices and detailed areas. For stubborn spots, try using isopropyl alcohol or a specialized 3D print cleaning solution.
Avoid harsh solvents that could damage the plastic. After cleaning, rinse the part thoroughly and allow it to air dry completely before further use or post-processing.

How to Use Blender for 3D Printing – Easy Ways to Follow
How to Make Thermal Printer Print Darker – 4 Easy Methods
How to Use Fusion 360 for 3D Printing – Easy Ways to Follow
About Author
Mark Kelly
This is Mark, a printer expert from North Carolina, US. It has been 8 years since I started using and reviewing printers of all types. With that said, I decided to share my knowledge with you lovely people so you can make the perfect choice when it comes to choosing a printer.