How to Print Screen on Logitech Keyboard K850 – Easy Steps
In today’s digital landscape, the ability to capture screenshots has become an indispensable skill for computer users. Whether you’re documenting a software glitch, preserving a crucial conversation, or crafting a tutorial, knowing how to efficiently take a screenshot can significantly boost your productivity.
If you’re using a Logitech K850 keyboard, you might be pondering the most effective ways to capture your screen. This comprehensive guide will elucidate various methods to print screen on your Logitech K850 keyboard, ensuring you can capture precisely what you need, when you need it.
The Logitech K850 is a versatile wireless keyboard renowned for its ergonomic design and multi-device compatibility. While it lacks a dedicated “Print Screen” key found on some traditional keyboards, it offers several alternatives for capturing screenshots.
We’ll delve into these methods, covering both built-in Windows functions and Logitech-specific features that can streamline your screenshot process. By the end of this guide, you’ll be adept at capturing any on-screen content with ease and precision.
How to Print Screen on Logitech Keyboard K850
While the K850 doesn’t have a dedicated Print Screen key, it does offer function keys that can be customized using Logitech’s software. This customization capability opens up various possibilities for screenshot capture, which we’ll explore in the following sections.
Method 1: Using Windows Default Screenshot Functions
Even without a dedicated Print Screen key, you can still use Windows’ built-in screenshot functions with your Logitech K850 keyboard. Here are two primary ways to do this:
Step 1: Capture the Entire Screen
Press the “Windows key + Shift + S” simultaneously on your Logitech K850 keyboard. This will activate the Windows Snipping Tool in capture mode, dimming your screen and presenting you with several capture options.
Step 2: Choose Your Capture Mode
At the top of your screen, you’ll see several icons representing different capture modes. From left to right, these are:
- Rectangular Snip: Allows you to draw a rectangle around the area you want to capture.
- Freeform Snip: Lets you draw any shape to capture a specific area.
- Window Snip: Captures an entire window that you select.
- Fullscreen Snip: Captures your entire screen.
Select the mode that best suits your needs by clicking on the corresponding icon.
Step 3: Capture Your Screenshot
Once you’ve selected your capture mode, proceed to capture your screenshot. If you chose Rectangular or Freeform Snip, click and drag your cursor to select the area you want to capture.
For Window Snip, simply click on the window you want to capture. The Fullscreen Snip will automatically capture your entire screen.
Step 4: Edit and Save Your Screenshot
After capturing your screenshot, it will be saved to your clipboard and a notification will appear in the lower right corner of your screen.
Click on this notification to open the Snip & Sketch app, where you can edit your screenshot if needed. To save the screenshot, click on the Save icon in the upper right corner of the Snip & Sketch window.
Note: The next model in the K850 keyboard’s series was Logitech K870. We also have a dedicated guide on how to print screen on Logitech keyboard K780.
Method 2: Using Logitech Options Software
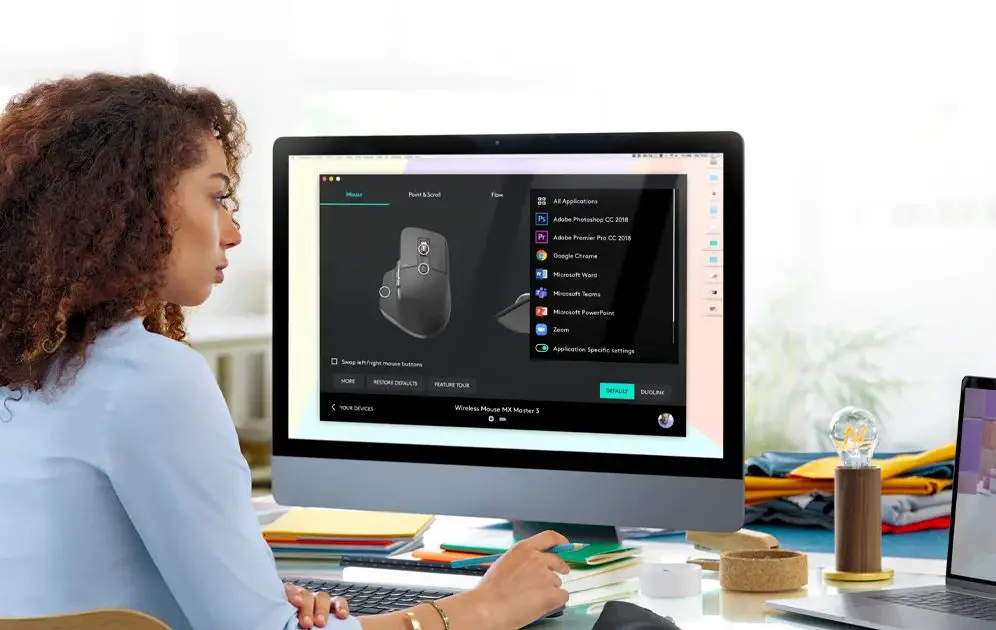
Logitech provides software that allows you to customize your K850 keyboard’s functions. By using this software, you can assign screenshot functionality to one of your function keys, creating a dedicated Print Screen button.
Step 1: Download and Install Logitech Options
If you haven’t already, download and install the Logitech Options software from the official Logitech website. This software is designed to enhance the functionality of your Logitech devices, including the K850 keyboard.
Step 2: Open Logitech Options
Once installed, open the Logitech Options software. You should see your K850 keyboard listed among your devices.
Step 3: Select a Function Key to Customize
In the Logitech Options interface, locate the section that displays your keyboard’s function keys. Choose a function key that you’d like to assign as your new Print Screen key. Many users prefer to use F12 for this purpose, but you can select any key that suits your workflow.
Step 4: Assign the Print Screen Function
Click on the function key you’ve chosen to customize. A menu will appear with various options. Look for “Screenshot” or “Print Screen” in this list. If you don’t see it immediately, you may need to select “Keystroke Assignment” and then manually input the Print Screen command.
Step 5: Save Your Changes
After assigning the Print Screen function to your chosen key, make sure to save your changes in the Logitech Options software. Your selected function key will now act as a dedicated Print Screen button.
Step 6: Test Your New Print Screen Key
To ensure your new Print Screen key is working correctly, press it while viewing a screen you’d like to capture. The screen should flash briefly, indicating that a screenshot has been taken. You can find this screenshot saved in your Pictures > Screenshots folder by default.
Note: For more precise captures, you can use the Windows Snipping Tool. Press Windows Key + Shift + S to open the Snipping Tool interface, which allows you to select specific areas of your screen for capture.
Method 3: Using Third-Party Screenshot Software
While the built-in Windows functions and Logitech Options provide robust screenshot capabilities, some users might prefer more advanced features. In this case, third-party screenshot software can be an excellent option.
Step 1: Choose a Third-Party Screenshot Tool
Research and select a third-party screenshot tool that meets your needs. Popular options include Snagit, Greenshot, and ShareX. These tools often offer features like timed screenshots, scrolling captures, and advanced editing options.
Step 2: Download and Install the Software
Once you’ve chosen your preferred tool, download it from the official website and follow the installation instructions. Be sure to only download software from reputable sources to protect your system.
Step 3: Configure the Software
After installation, open the software and navigate to its settings or preferences menu. Look for an option to set custom hotkeys for different screenshot functions.
Step 4: Assign Screenshot Functions to Your K850 Keys
In the hotkey settings of your chosen software, assign various screenshot functions to different keys or key combinations on your Logitech K850 keyboard. For example, you might set Ctrl + F12 for full-screen captures and Ctrl + F11 for region captures.
Step 5: Save Your Settings
Once you’ve configured your preferred hotkeys, save your settings in the screenshot software.
Step 6: Test Your New Screenshot Functions
Test each of your newly assigned screenshot functions to ensure they’re working correctly with your Logitech K850 keyboard.
Related Guide: How to Check Ink Levels on Epson ET-2760
Conclusion
Mastering the art of taking screenshots with your Logitech K850 keyboard can significantly boost your productivity and enhance your digital communication. While the keyboard doesn’t come with a dedicated Print Screen key, the methods we’ve explored – from using Windows’ built-in functions to leveraging Logitech’s customization options and third-party tools – provide a range of solutions to fit various needs and preferences.
Remember that the key to efficient screenshot capture is finding the method that works best for your specific workflow. Experiment with different approaches, customize your keyboard settings, and don’t hesitate to explore advanced features offered by specialized screenshot software.
As technology continues to evolve, so too will the methods and tools available for capturing and sharing visual information. Stay curious, keep exploring new features and updates, and you’ll always be prepared to capture that perfect screenshot whenever the need arises.
Whether you’re troubleshooting technical issues, creating instructional content, or simply sharing moments from your digital life, your Logitech K850 keyboard, armed with these screenshot techniques, is more than capable of rising to the challenge. Happy screenshotting!
Frequently Asked Questions (FAQs)
1. What are the function keys on the Logitech k850 keyboard?
The Logitech K850 keyboard features a set of function keys that serve dual purposes. The primary F1-F12 keys perform standard functions, while their secondary roles are activated using the Fn key. These include media controls like play/pause, volume adjustment, and track navigation.
The keyboard also offers quick access to calculator, email, and web browser applications. Some keys provide system controls such as sleep mode and screen lock. Additionally, there are keys for adjusting screen brightness and managing multiple devices connected to the keyboard.
These function keys enhance productivity by providing quick access to commonly used features and controls without the need for complex key combinations.
2. What is the Windows key on Logitech keyboard k850?
The Windows key on the Logitech K850 keyboard is a versatile and essential input device. Located in the bottom row, typically between the Ctrl and Alt keys, it features the familiar Windows logo. This key serves as a quick launcher for the Start menu in Windows operating systems.
When pressed in combination with other keys, it activates various system shortcuts, enhancing user efficiency. For instance, Windows + L locks the computer, while Windows + D shows the desktop.
The K850’s Windows key is designed to be easily accessible, allowing users to navigate their system swiftly. Its inclusion reflects Logitech’s commitment to providing a seamless Windows experience on their keyboards.
3. What is the easy switch button on Logitech k850 keyboard?
The Easy-Switch button on the Logitech K850 keyboard is a innovative feature that enhances multi-device functionality. Located at the top of the keyboard, this button allows users to seamlessly switch between up to three different devices, such as a computer, tablet, or smartphone.
Each device is assigned to a numbered key (1, 2, or 3). By pressing the Easy-Switch button followed by the corresponding number, users can instantly change which device the keyboard is controlling.
This feature eliminates the need for multiple keyboards and streamlines workflow for those who frequently work across different devices. It’s particularly useful for professionals and multitaskers who value efficiency in their digital interactions.

