
How to Print Excel Sheets in A4 Size Full Page Landscape – 5 Easy Ways
Printing Excel spreadsheets can be a perplexing task, especially when you need to fit all your data onto a single A4 page in landscape orientation.
Whether you’re dealing with financial reports, project timelines, or intricate data sets, mastering the art of printing in Excel is crucial for presenting your work effectively.
This guide will demystify the process of printing Excel sheets in A4 size full page landscape. We’ll explore various methods, from basic print settings to more sophisticated techniques, ensuring you can handle even the most recalcitrant spreadsheets with ease.
You’ll learn how to navigate Excel’s labyrinthine print options and page layout features, optimizing your data for the perfect printout.
By the end of this article, you’ll have the knowledge to transform your Excel printing woes into triumphs. Whether you’re a seasoned professional or a novice user, these strategies will help you present your data clearly and professionally.
How to Print Excel Sheets in A4 Size Full Page Landscape
So, let’s dive in and unravel the mysteries of Excel printing, ensuring your spreadsheets always make a stellar impression on paper.
Method 1: Using Basic Print Settings
The simplest way to print your Excel sheet in A4 size full page landscape is by adjusting the basic print settings. This method is suitable for spreadsheets that don’t require extensive formatting adjustments.
Step 1: Open your Excel spreadsheet
Open the Excel file containing the sheet you want to print.
Step 2: Access the Print menu
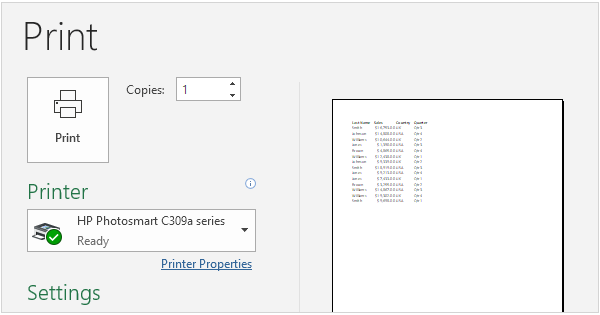
Click on the “File” tab in the top-left corner of the Excel window, then select “Print” from the left sidebar. Alternatively, you can use the keyboard shortcut Ctrl + P (Windows) or Command + P (Mac).
Step 3: Change the orientation to Landscape
In the Print menu, look for the “Orientation” option. Click on it and select “Landscape” from the dropdown menu.
Step 4: Set the paper size to A4
Find the “Paper Size” option in the Print menu. Click on it and choose “A4” from the list of available sizes.
Step 5: Adjust scaling options
To ensure your spreadsheet fits on a single page, look for the “Scaling” options. Select “Fit Sheet on One Page” to automatically adjust the content to fit within the A4 landscape page.
Step 6: Preview and print
Use the preview pane on the right side of the Print menu to check if your spreadsheet looks correct. If everything appears as desired, click the “Print” button to send the job to your printer.
Related Article: How to Keep Header Row in Excel When Printing
Method 2: Using Page Layout View
For more precise control over how your spreadsheet will print, you can use Excel’s Page Layout view. This method allows you to see exactly how your content will appear on the printed page.
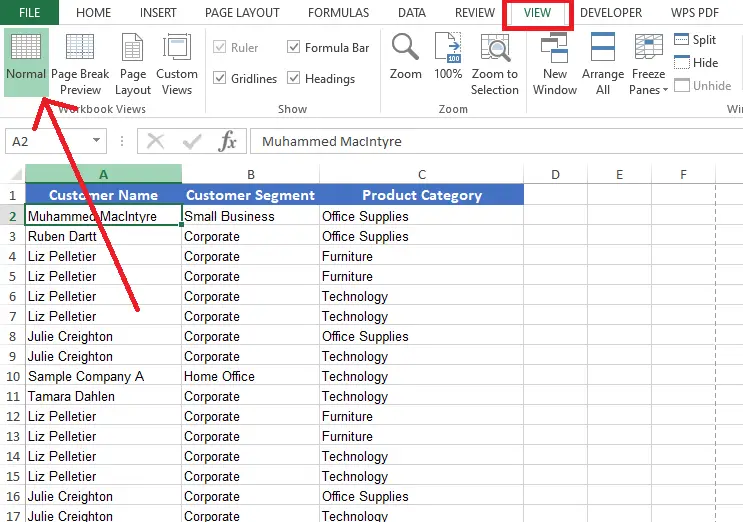
Step 1: Switch to Page Layout view
Go to the “View” tab in the Excel ribbon and click on “Page Layout” in the Workbook Views section.
Step 2: Adjust page margins
With Page Layout view active, you can directly manipulate page margins by dragging the blue margin lines. Reduce margins to maximize the printable area on your A4 landscape page.
Tip: Enable text wrapping for cells with long content to maintain readability without expanding column widths.
Step 3: Set page orientation and size
Click on the “Page Layout” tab in the ribbon, then find the “Orientation” button and select “Landscape”. Next to it, click on “Size” and choose “A4”.
Step 4: Scale content to fit
In the “Scale to Fit” group of the Page Layout tab, check the “Width” and “Height” boxes, setting both to “1 page”. This ensures your content will fit on a single A4 landscape page.
Step 5: Adjust column widths and row heights
Manually resize columns and rows as needed to optimize the layout for landscape printing. You can do this by dragging the column and row headers or by using the “Format” options in the Home tab.
Step 6: Preview and print
Once you’re satisfied with the layout, go to File > Print to preview and print your spreadsheet.
Method 3: Using Custom Scaling
Sometimes, automatic scaling doesn’t produce the desired results. In such cases, you can use custom scaling to fine-tune how your spreadsheet fits on the A4 landscape page.
Step 1: Access Print settings
Open the Print menu by going to File > Print or using the Ctrl + P (Windows) or Command + P (Mac) shortcut.
Step 2: Set orientation and paper size
Ensure that “Landscape” orientation and “A4” paper size are selected in the Print settings.
Step 3: Open custom scaling options
Instead of using “Fit Sheet on One Page”, click on “No Scaling” to access more options.
Step 4: Adjust custom scale percentage
Look for the “Custom Scaling Options” link and click on it. In the new window, select “Adjust to” and enter a percentage. Start with 95% and adjust as needed to fit your content.
Step 5: Apply and preview
Click “OK” to apply the custom scaling. Use the preview pane to check if the content fits properly on the A4 landscape page.
Step 6: Fine-tune and print
If necessary, return to the custom scaling options and adjust the percentage until you achieve the desired result. Once satisfied, print your spreadsheet.
Note: For multi-page printouts, use print titles to repeat important headers on each page.
Method 4: Using Print Area
Defining a specific print area can be useful when you only need to print a portion of your spreadsheet in A4 landscape format.
Step 1: Select the desired range
Highlight the cells you want to include in your printout.
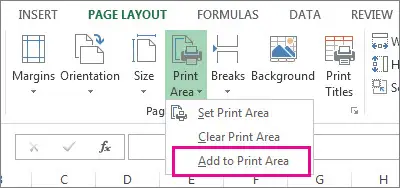
Step 2: Set the Print Area
Go to the “Page Layout” tab and click on “Print Area” in the Page Setup group. Choose “Set Print Area” from the dropdown menu.
Step 3: Adjust page settings
With the print area set, go to File > Print. Set the orientation to “Landscape” and the paper size to “A4”.
Step 4: Scale to fit
In the Print menu, select “Fit Sheet on One Page” under the scaling options to ensure your defined print area fits on a single A4 landscape page.
Step 5: Preview and print
Use the preview pane to confirm that only your selected print area appears and fits correctly on the page. If everything looks good, proceed with printing.
Related Article: How to Print White on Black Paper
Method 5: Using Page Break Preview
Page Break Preview allows you to see and adjust where Excel will naturally break your content across pages, which can be helpful for optimizing your A4 landscape print.
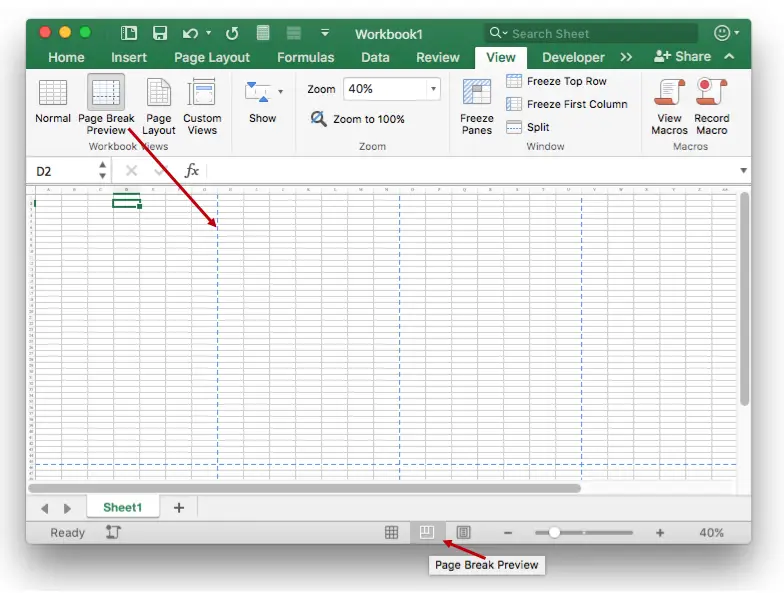
Step 1: Switch to Page Break Preview
Go to the “View” tab and click on “Page Break Preview” in the Workbook Views section.
Step 2: Adjust page breaks
In this view, you’ll see blue dashed lines indicating page breaks. Click and drag these lines to adjust where the breaks occur, ensuring all your content fits on one page.
Step 3: Set page orientation and size
Go to the “Page Layout” tab, set “Orientation” to “Landscape”, and “Size” to “A4”.
Step 4: Scale to fit
In the “Scale to Fit” group, set both “Width” and “Height” to “1 page” to ensure everything fits on a single A4 landscape sheet.
Step 5: Fine-tune content
If necessary, return to the normal view to adjust column widths, row heights, or font sizes to optimize the layout based on the page breaks you’ve set.
Step 6: Print your spreadsheet
Once you’re satisfied with the layout, go to File > Print to preview and print your optimized spreadsheet.
Conclusion
Mastering the art of printing Excel sheets in A4 size full page landscape is an essential skill for professionals who rely on spreadsheets for data presentation and analysis.
By understanding and applying the methods outlined in this guide, you can ensure that your Excel printouts are always perfectly formatted, legible, and professional-looking.
From basic print settings adjustments to advanced VBA automation, there’s a solution for every scenario and skill level. Remember to always preview your prints, optimize your spreadsheet layout, and consider the tips provided to achieve the best results.
With practice, you’ll find that what once seemed like a challenging task becomes second nature. You’ll be able to quickly adjust your Excel sheets for A4 landscape printing, saving time and reducing frustration in your workflow.
Whether you’re preparing financial reports, project schedules, or data visualizations, you now have the knowledge to present your Excel data in the best possible format, impressing colleagues and clients alike with your polished and professional outputs.
Frequently Asked Questions (FAQs)
1. How to print full page A4 in Excel?
To print a full page A4 in Excel, start by opening your document and navigating to the Page Layout tab. Under Scale to Fit, set both Width and Height to 1 page. Next, fine-tune your settings in Page Setup, adjusting margins and selecting a specific print area if needed.
When you’re ready to print, go to File > Print, choose your printer, and carefully review the print preview. Here, you can make final adjustments to orientation or print quality.
This method ensures your entire spreadsheet fits on a single A4 page without cutting off any content. Always double-check the preview before printing to avoid wasting paper and ink.
2. How to print excel landscape full page?
To print an Excel spreadsheet in landscape orientation and full page:
Open your Excel file and go to the Page Layout tab. Click on Orientation and select Landscape. Next, under Scale to Fit, set Width to 1 page and adjust Height as needed. For further customization, open Page Setup and fine-tune margins or scaling.
When ready, click File > Print. In the print preview, ensure the layout looks correct. If necessary, adjust print area or column widths to fit everything on one page.
Select your printer, choose any additional settings like print quality, and click Print. This method optimizes your spreadsheet for landscape printing, making it easier to view wide data sets on a single page.
3. How do I make Excel print fit the whole page?
To make Excel print fit the whole page, start by selecting the Page Layout tab. Under Scale to Fit, set both Width and Height to 1 page. This automatically adjusts your content to fit on a single sheet.
For more control, click the dialog box launcher in the Scale to Fit group to open Page Setup. Here, you can fine-tune scaling, margins, and orientation. Alternatively, use the Print Preview in the File > Print menu to visually adjust your document.
You can also manually resize columns and rows or hide unnecessary ones to maximize space. Remember to check the print preview before finalizing to ensure all your data is visible and properly formatted on one page.
How to Print STL Files on Ender 3 – Easy Ways
How to Copy on Canon TS3522 Printer – Easy Steps to Follow
How to Edit 3D Print Files – Easy Methods to Follow
About Author
Mark Kelly
This is Mark, a printer expert from North Carolina, US. It has been 8 years since I started using and reviewing printers of all types. With that said, I decided to share my knowledge with you lovely people so you can make the perfect choice when it comes to choosing a printer.